Wednesday, August 26, 2009

dobos torta


The August 2009 Daring Bakers' challenge was hosted by Angela of A Spoonful of Sugar and Lorraine of Not Quite Nigella. They chose the spectacular Dobos Torte based on a recipe from Rick Rodgers' cookbook Kaffeehaus: Exquisite Desserts from the Classic Caffés of Vienna, Budapest, and Prague.

Have you ever been intimidated by a cake?  I have.  I know... you're thinking "Suck it up, buttercup - it's just a cake."  I mean, cakes are so tasty - how can they be threatening?


So when I logged on to my first ever Daring Baker's challenge this month, I was sooo excited.  What would the challenge be?  And then my heart sank.  It was a Dobos Torta - a multi-layered sponge cake.  Normally layered sponge cakes don't phase me much, but this one was free form.  I was apprehensive.  I was worried that my layers would turn out all uneven and messy.  What if they burned?  What if they tore when peeling off the parchment?  What if they were an uneven, sloppy mess?  In my mind I imagined all the ways this recipe could go pear shaped.  

But heck – this is why I joined the Daring Bakers for in the first place.   I knew the challenges would help me stretch my skills and lead me to bake things I would never have thought to try.

So I rolled up my sleeves, put my game face on and decided to put aside a day to make the torta.

I adapted the recipe a tad. Instead of a five layered torte, I decided to make mine higher with 10 layers. Also, I am not a fan of hazelnuts (one of the few things I dislike!) so substituted almonds.

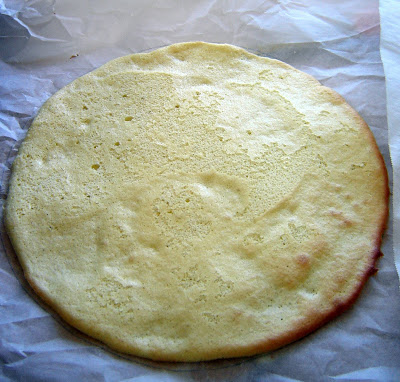
I’m not going to sugar coat things. Baking the sponge cake layers was time consuming. The recipe that Angela and Lorraine provided suggested that this stage would take about 60 minutes total – it took me almost twice that. But then again, I was going slow to ensure I got it right the first time and wouldn’t have any “re-dos”.

And it worked! It was so worth it… I didn’t mess up the sponge cake layers! They turned out just fine.

Sponge cake layers

6 large eggs, separated, at room temperature
1 1/3 cups confectioner's (icing) sugar, divided
1 teaspoon (5ml) vanilla extract
1 cup plus 2 tablespoons (112g) sifted cake flour
pinch of salt

Directions for the sponge layers:
NB. The sponge layers can be prepared in advance and stored interleaved with parchment and well-wrapped in the fridge overnight.

1.Position the racks in the top and centre thirds of the oven and heat to 400F (200C).

2.Cut six pieces of parchment paper to fit the baking sheets. Using the bottom of a 9" (23cm) springform tin as a template and a dark pencil or a pen, trace a circle on each of the papers, and turn them over (the circle should be visible from the other side, so that the graphite or ink doesn't touch the cake batter.)

3.Beat the egg yolks, 2/3 cup (81g) of the confectioner's (icing) sugar, and the vanilla in a medium bowl with a mixer on high speed until the mixture is thick, pale yellow and forms a thick ribbon when the beaters are lifted a few inches above the batter, about 3 minutes. (You can do this step with a balloon whisk if you don't have a mixer.)

4.In another bowl, using clean beaters, beat the egg whites until soft peaks form. Gradually beat in the remaining 2/3 cup (81g) of confectioner's (icing)sugar until the whites form stiff, shiny peaks. Using a large rubber spatula, stir about 1/4 of the beaten whites into the egg yolk mixture, then fold in the remainder, leaving a few wisps of white visible. Combine the flour and salt. Sift half the flour over the eggs, and fold in; repeat with the remaining flour.

5.Line one of the baking sheets with a circle-marked paper. Using a small offset spatula, spread about 3/4cup of the batter in an even layer, filling in the traced circle on one baking sheet. Bake on the top rack for 5 minutes, until the cake springs back when pressed gently in the centre and the edges are lightly browned. While this cake bakes, repeat the process on the other baking sheet, placing it on the centre rack. When the first cake is done, move the second cake to the top rack. Invert the first cake onto a flat surface and carefully peel off the paper. Slide the cake layer back onto the paper and let stand until cool. Rinse the baking sheet under cold running water to cool, and dry it before lining with another parchment. Continue with the remaining papers and batter to make a total of six layers. Completely cool the layers. Using an 8" springform pan bottom or plate as a template, trim each cake layer into a neat round. (A small serrated knife is best for this task.)


Now this buttercream recipe is fantastic! I’m going to keep this for lots of other yummy creations… Just a warning though – it was nice and thick until I added the chocolate and then it got really runny. So I continued to cook it for three minutes and pulled it off to cool. It does thicken.But it gets much thicker after you’ve beaten in the butter and refrigerated it. Refrigerate it for an hour or two prior to using if you can.

Chocolate Buttercream

4 large eggs, at room temperature
1 cup (200g) caster (ultrafine or superfine white) sugar
4oz (110g) bakers chocolate or your favourite dark chocolate, finely chopped
2 sticks plus 2 tablespoons (250g) unsalted butter, at room temperature.

Directions for the chocolate buttercream: 
NB. This can be prepared in advance and kept chilled until required.

1.Prepare a double-boiler: quarter-fill a large saucepan with water and bring it to a boil.

2.Meanwhile, whisk the eggs with the sugar until pale and thickened, about five minutes. You can use a balloon whisk or electric hand mixer for this.

3.Fit bowl over the boiling water in the saucepan (water should not touch bowl) and lower the heat to a brisk simmer. Cook the egg mixture, whisking constantly, for 2-3 minutes until you see it starting to thicken a bit. Whisk in the finely chopped chocolate and cook, stirring, for a further 2-3 minutes.

4.Scrape the chocolate mixture into a medium bowl and leave to cool to room temperature. It should be quite thick and sticky in consistency.

5.When cool, beat in the soft butter, a small piece (about 2 tablespoons/30g) at a time. An electric hand mixer is great here, but it is possible to beat the butter in with a spatula if it is soft enough. You should end up with a thick, velvety chocolate buttercream. Chill while you make the caramel topping.


Lorraine's note: If you're in Winter just now your butter might not soften enough at room temperature, which leads to lumps forming in the buttercream. Male sure the butter is of a very soft texture I.e. running a knife through it will provide little resistance, before you try to beat it into the chocolate mixture. Also, if you beat the butter in while the chocolate mixture is hot you'll end up with more of a ganache than a buttercream!


Caramel topping

1 cup (200g) caster (superfine or ultrafine white) sugar
12 tablespoons (180 ml) water
8 teaspoons (40 ml) lemon juice
1 tablespoon neutral oil (e.g. grapeseed, rice bran, sunflower)

Directions for the caramel topping:

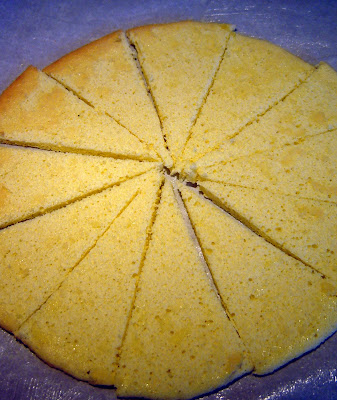
1.Choose the best-looking cake layer for the caramel top. To make the caramel topping: Line a jellyroll pan with parchment paper and butter the paper. Place the reserved cake layer on the paper. Score the cake into 12 equal wedges. Lightly oil a thin, sharp knife and an offset metal spatula.


2.Stir the sugar, water and lemon juice in a small saucepan. Bring to a boil over a medium heat, stirring often to dissolve the sugar. Once dissolved into a smooth syrup, turn the heat up to high and boil without stirring, swirling the pan by the handle occasionally and washing down any sugar crystals on the sides of the pan with a wet brush until the syrup has turned into an amber-coloured caramel.

3.The top layer is perhaps the hardest part of the whole cake so make sure you have a oiled, hot offset spatula ready. I also find it helps if the cake layer hasn't just been taken out of the refrigerator. I made mine ahead of time and the cake layer was cold and the toffee set very, very quickly—too quickly for me to spread it. Immediately pour all of the hot caramel over the cake layer. You will have some leftover most probably but more is better than less and you can always make nice toffee pattern using the extra to decorate. Using the offset spatula, quickly spread the caramel evenly to the edge of the cake layer. Let cool until beginning to set, about 30 seconds. Using the tip of the hot oiled knife (keep re-oiling this with a pastry brush between cutting), cut through the scored marks to divide the caramel layer into 12 equal wedges. Cool another minute or so, then use the edge of the knife to completely cut and separate the wedges using one firm slice movement (rather than rocking back and forth which may produce toffee strands). Cool completely.

Angela's note: I recommend cutting, rather than scoring, the cake layer into wedges before covering in caramel (reform them into a round). If you have an 8” silicon round form, then I highly recommend placing the wedges in that for easy removal later and it also ensures that the caramel stays on the cake layer. Once set, use a very sharp knife to separate the wedges.

Assembling the Dobos
Divide the buttercream into six equal parts.

Place a dab of chocolate buttercream on the middle of a 7 1/2” cardboard round and top with one cake layer. Spread the layer with one part of the chocolate icing. Repeat with 4 more cake layers. Spread the remaining icing on the sides of the cake.

Optional: press the finely chopped hazelnuts onto the sides of the cake.

Propping a hazelnut under each wedge so that it sits at an angle, arrange the wedges on top of the cake in a spoke pattern. If you have any leftover buttercream, you can pipe rosettes under each hazelnut or a large rosette in the centre of the cake. Refrigerate the cake under a cake dome until the icing is set, about 2 hours. Let slices come to room temperature for the best possible flavour.

carrot cake with toasted coconut cream cheese frosting

My family loves loves loves carrot cake. My eldest son requested it as his birthday cake for years, and my youngest son spent three days last week asking me for it. I’m always on the lookout for tasty, low-fat versions and I found one on the “Cooking Light” website that looked worth a try. And the appearance of a jar of carrot baby food was intriguing!


This was super-quick to whip up, and the addition of carrot baby food made the batter a interesting, bright orange colour… but the batter looked promising and of course I had to do some quality assurance testing and the batter tasted great! (but remember to turn the beaters off prior to licking them).


The cream cheese frosting seemed to have too much icing sugar, so I actually decreased my amount to under 1 cup and upped the cream cheese to four ounces (half a block of low-fat Philly). I admit, I burnt the coconut the first go around. There was a really good movie on at the time and when I remembered there was coconut “toasting” in the oven, it was too late… fortunately I caught it before it got the smoke detector blaring, but just barely!


My second effort turned out much better, but I did one cake with some coconut added, and some without.


The cake itself was moist and delicious. My youngest son just informed me that he snuck some for breakfast. Considering the ingredients, that’s not such a bad thing!


Carrot Cake with Toasted Coconut Cream Cheese Frosting

(from "Cooking Light")


Cake:


3/4 cup all-purpose flour (about 3 1/3 ounces)

1/4 cup quick-cooking oats

1 1/2 teaspoons ground cinnamon

1 teaspoon baking powder

1/2 teaspoon baking soda

1/4 teaspoon salt

1 cup granulated sugar

1/4 cup canola oil

1 (2 1/2-ounce) jar carrot baby food

2 large eggs, lightly beaten

1 1/4 cups finely grated carrot (about 4 ounces)

1/2 cup golden raisins

Cooking spray


Frosting:


1/3 cup (3 ounces) 1/3-less-fat cream cheese, softened

1 tablespoon butter, softened

1 1/4 cups powdered sugar, sifted

1/2 teaspoon vanilla extract

1/4 cup flaked sweetened coconut, toasted

Preheat oven to 325°.


To prepare cake, lightly spoon flour into dry measuring cups; level with a knife. Combine flour and next 5 ingredients (through salt) in a food processor; pulse 6 times or until well blended. Place flour mixture in a large bowl. Combine granulated sugar, canola oil, baby food, and eggs; stir with a whisk. Add to flour mixture; stir just until moist. Stir in grated carrot and raisins. Spoon batter into an 8-inch square baking pan coated with cooking spray.


Bake at 325° for 40 minutes or until a wooden pick inserted in center comes out clean. Cool in pan on a wire rack.


To prepare frosting, combine cheese and butter in a large bowl. Beat with a mixer at high speed until creamy. Gradually add powdered sugar and vanilla, beating at low speed until smooth (do not overbeat). Spread over cake; sprinkle with coconut. Cover and chill.


Yield: 12 servings (serving size: 1 piece)


CALORIES 262 (30% from fat); FAT 8.8g (sat 2.7g,mono 3.6g,poly 1.6g); IRON 0.9mg; CHOLESTEROL 44mg; CALCIUM 47mg; CARBOHYDRATE 44.1g; SODIUM 201mg; PROTEIN 3.2g; FIBER 1.2g


Thursday, August 13, 2009

light corn & blueberry muffins

I have a lot of blueberries to use up (I love these predicaments!) so decided to make blueberry muffins for breakfast. There’s something great about having fresh, hot muffins in the morning. I baked these on a weekday, so in order to make it less stressful with all the morning chaos around here (getting two young boys out the door in the morning can be a hair pulling experience – lots of “Aren’t you dressed YET?!?!”… and “Why are you building a fort in the living room now?!?!”) I prepared the dry ingredients and the wet ingredients the night before. So all I had to do when I woke up was to whip the butter and sugar together and assemble the rest while the oven was heating up. 10 minutes tops. Then the muffins can bake while I jump in the shower. Not too hard at all, really.


You can forget the final step in the recipe which suggests letting them cool an additional 10 minutes before eating them. Whatever! Really – that’s just not realistic. Just be mindful that those blueberries can be hot as your scarfing them down.


Light Corn & Blueberry Muffins

(adapted from America’s Test Kitchen’s “Family Baking Book”)


2 cups all purpose flour (plus 1 tablespoon)

1 cup yellow cornmeal

1 cup sugar (plus some more to sprinkle on muffins)

1 tablespoon baking powder

½ teaspoon baking soda

½ teaspoon salt

¾ cup plain low-fat yogurt

½ cup whole milk (2% also works, but the authors discourage using skim)

1 teaspoon vanilla extract

4 tablespoons butter, softened

2 large eggs

2 cups fresh or frozen blueberries


Preheat oven to 375 degrees. Spray a 12-cup muffin tin with vegetable oil spray.


Whisk the flour, cornmeal, ¼ cup of the sugar, baking powder, baking soda, and salt together in a medium bowl; set aside. In a small bowl, stir the yogurt, milk and vanilla together.


In a large bowl, beat the remaining ¾ cup sugar and butter together with an electric mixer on medium-high speed until light and fluffy, 3 to 6 minutes, scraping down the sides of the bowl with a rubber spatula as needed. Add the eggs, one at a time, beating well after each addition.


Reduce the mixer speed to low. Beat in one-third of the flour mixture until just incorporated, followed by half of the yogurt mixture, scraping down the bowl as needed. Repeat with half of the remaining flour mixture and the remaining yogurt. Try not overmix. Beat in the remaining flour mixture until just incorporated. Gently fold blueberries, tossed with 1 tablespoon flour, into the finished batter.


Using a 1/3 cup measure sprayed with vegetable oil spray, portion the batter into each muffin cup, then portion any remaining batter evenly among the cups using a small spoon. Sprinkle each muffin with ½ teaspoon sugar. Bake until golden and toothpick comes out with just a few crumbs attached, 18 to 20 minutes, rotating the pan half-way through baking.


Let the muffins cool in the pan for 5 minutes, then flip out onto a wire rack and let cool for 10 minutes before serving.


Oh – and here’s the nutritional info for each muffin:

Cal 300; Fat 5g; Sat fat 3.5g; Chol 50 mg; Carb 58 g; Protein 6g; Fiber 2g; Sodium 270 mg


Wednesday, August 12, 2009

chocolate zucchini cake

This time of year, it seems as though people have zucchini coming out of their ears. While I neglected to plant zucchini this year, I have the next best thing – a coworker with zucchini coming out of his ears! So I’ve been fortunate enough to know someone who is willing to share his zucchini bounty. I can’t turn away free food – it’s simply not possible. Well, perhaps I could turn away a few things… snouts come to mind… tripe… you get the picture… anyway we’re talking zucchini here! And it’s a vegetable that goes well with chocolate!

The only downside to making this cake is grating the two cups of zucchini. However I happen to My mom gave it to me years ago. I must admit it spent the first year or so collecting dust in my appliance cupboard, but then I clued in that it not only shoots slices of cucumber, it grates things like carrots, apples and zucchini. Carrot cake and morning glory muffins suddenly became easy-peasy. So apart from the lame name, it’s a pretty handy gadget to have.


So here we go… zucchini in all its chocolately goodness…


Chocolate Zucchini Cake

(from Jean Paré's "Cakes")


Butter or margarine, softened ½ cup

Sugar 1 ¾ cups

Eggs 2

Cooking Oil ½ cup

Sour milk (1 tbsp vinegar plus ½ cup milk)

Vanilla 1 tsp

Grated zucchini with peel 2 cups

All-purpose flour 2 ½ cups

Cocoa 1/3 cup

Baking soda 1 tsp

Baking powder ½ tsp

Cinnamon ½ tsp

Salt ½ tsp

Semisweet chocolate chips ¾ cups


Preheat oven to 350 degrees. In a large mixing bowl cream butter and sugar together well. Beat in eggs 1 at a time. Mix in cooking oil, sour milk, vanilla and zucchini.

Mix next 6 ingredients together in small bowl. Add to batter. Stir to moisten. Spread in greased 9 x13 inch pan.


Sprinkle with chocolate chips. Bake in oven for about 35 minutes until an inserted wooden pick comes out clean.